Custom Fields
Define additional fields for addresses to capture data specific to your business needs.
Define additional fields for leads to capture data specific to your business needs.
Note: Custom fields are a premium feature. You need an active premium subscription (not Starter plan) to access this feature.
Accessing Custom Fields
- Ensure you're in your team account
- Click Custom Fields in the sidebar
- The URL is
https://sellfaster.eu/home/[team]/custom-fields
Note: Access requires the
managerorownerpermission or team owner status.
Overview
The custom fields page has two tabs:
- Fields - Manage individual field definitions
- Templates - Group fields into templates and assign them to campaigns
Field Types
Custom fields support the following types:
Text Fields
| Type | Description | Example |
|---|---|---|
| Text | Single line text with optional length limits and pattern validation | "ABC Company" |
| Email address with built-in validation | "user@example.com" | |
| Phone | Phone number with pattern validation | "+1 555-1234" |
| URL | Web address with URL validation | "https://example.com" |
Number Fields
| Type | Description | Example |
|---|---|---|
| Number | Numeric value with optional min/max and decimal places | 42 or 99.99 |
Date/Time Fields
| Type | Description | Example |
|---|---|---|
| Date | Date picker with optional min/max date range | 2024-01-15 |
| DateTime | Date and time in ISO 8601 format | 2024-01-15T14:30:00 |
Selection Fields
| Type | Description | Example |
|---|---|---|
| Dropdown | Single selection from predefined options | Choose one option |
| Multi-select | Multiple selections from predefined options | Choose multiple options |
Other Fields
| Type | Description |
|---|---|
| Boolean | Yes/No checkbox |
Creating Custom Fields
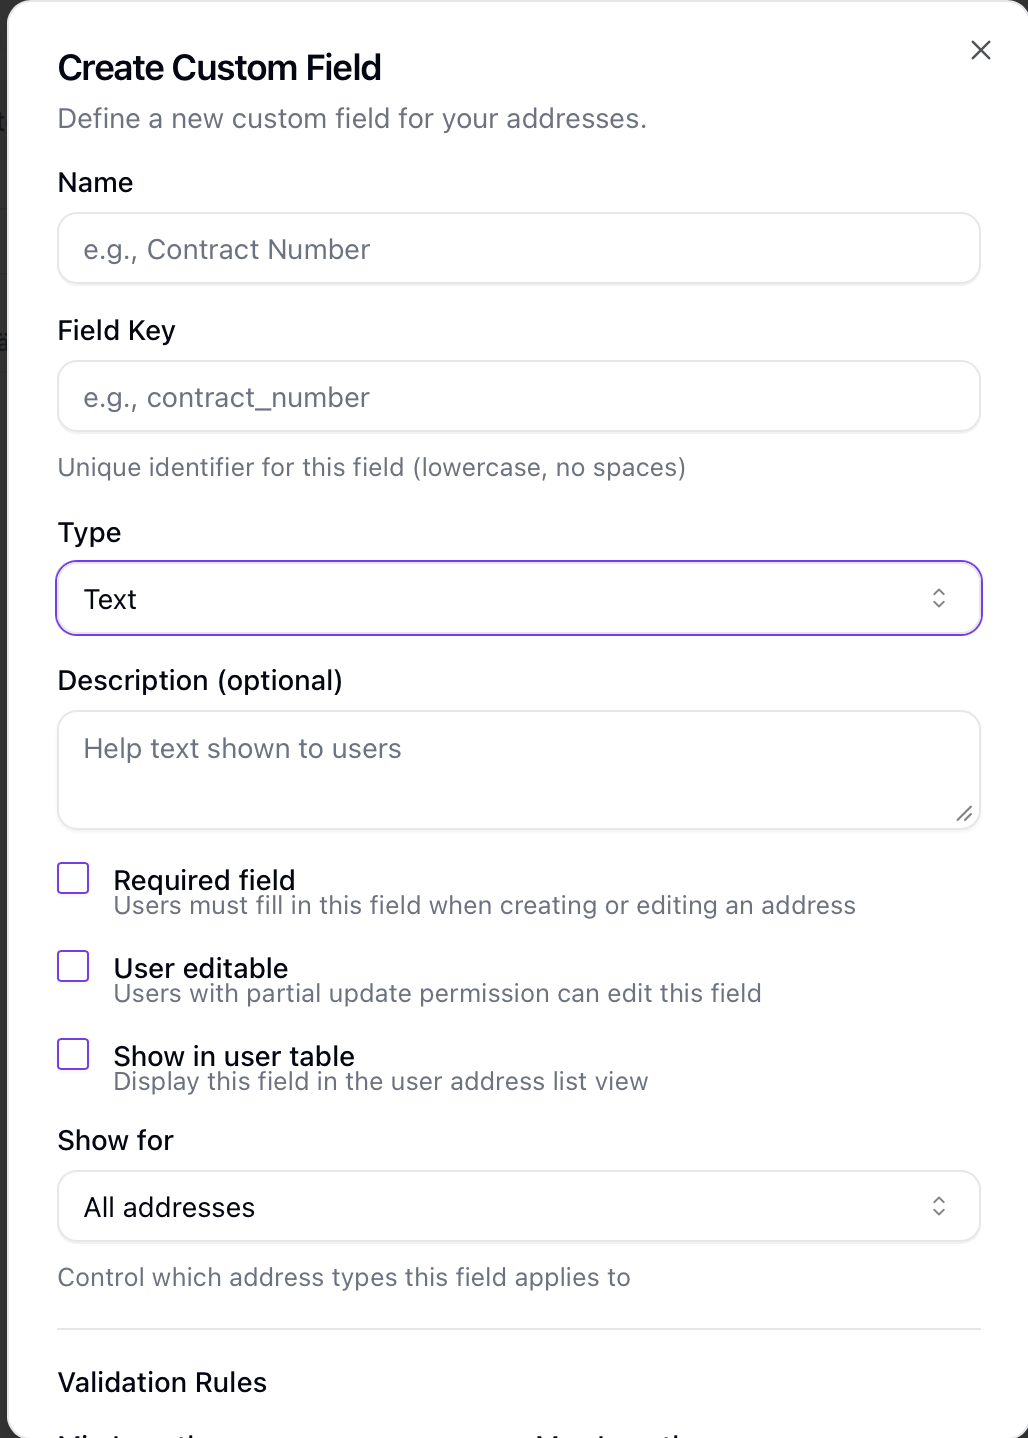
Add New Field
- Go to the Fields tab
- Click Create Field
- Fill in the form:
- Name (required) - Display name (1-100 characters)
- Field Key (required) - Unique identifier (lowercase letters, numbers, underscores only)
- Field Type (required) - Select from available types
- Description (optional) - Help text for users
- Required - Whether the field must be filled
- Default Value (optional) - Placeholder value for new entries
- Options - For dropdown/multi-select, define the available choices
- Validation Rules - Type-specific validation (see below)
- Save
Field Properties
| Property | Description |
|---|---|
| Name | Display label shown to users (1-100 characters) |
| Field Key | Internal identifier, must be unique per account (1-50 characters) |
| Description | Help text shown below the field (up to 500 characters) |
| Required | Field must have a value |
| User Editable | Whether end users can modify this field |
| Show in Table | Display field value in lead table (desktop and mobile) views |
| Visibility Condition | When field appears: All addresses, Buildings only, or Non-buildings only |
| GDPR Relevant | If enabled, the field's value is excluded from AI-generated summaries and is permanently deleted when the lead is anonymized via Scramble Data or a GDPR erasure request |
Validation Rules
Text fields:
- Minimum length
- Maximum length
- Pattern (regex)
Number fields:
- Minimum value
- Maximum value
- Decimal places
Date/DateTime fields:
- Minimum date
- Maximum date
Selection Options
For dropdown and multi-select fields:
- In the Options section, click Add Option
- Enter Value (internal identifier) and Label (display text)
- Add more options as needed
- Reorder by dragging
Editing Fields
Modify Field
- Click the actions menu on a field
- Select Edit
- Update properties
- Save
Note: The field key cannot be changed if the field is already in use to prevent data integrity issues.
Reordering Fields
Fields can be reordered to control display order on forms:
- Use the up/down arrows in the action menu of the rows
- Order saves automatically
Archiving Fields
Archive a Field
Instead of permanently deleting, archive fields to preserve data:
- Click the actions menu on a field
- Select Archive
- Confirm
When archived:
- Field no longer appears on forms
- Existing data is preserved
- Can be restored later
Restore a Field
- Enable Show archived to view archived fields
- Click the actions menu on the archived field
- Select Restore
Templates
What are Templates?
Templates are collections of fields that can be assigned to campaigns. This allows different projects to use different sets of custom fields.
Creating Templates
- Go to the Templates tab
- Click Create Template
- Enter:
- Name (required)
- Description (optional)
- Default - Mark as default template for new projects
- Save
Adding Fields to Templates
- Open a template
- Click Add Field
- Select fields to include
- Optionally override the "Required" setting per template
- Save
Reordering Template Fields
Fields within a template can be reordered:
- Use drag handles
- Order saves automatically
Assigning Templates to Projects
- Click the actions menu on a template
- Select Assign Campaign or Assign to All Campaigns
- Toggle projects on/off
- Changes save automatically
Note: Each campaign can only have one template assigned. Assigning a new template replaces the existing assignment.
Default Template
One template can be marked as default:
- Automatically assigned when creating new campaigns
- Set in template edit form or via the checkbox
Using Custom Fields
On Lead Forms
Custom fields appear automatically when:
- Creating a new lead
- Editing an existing lead
- The campaign has a template with fields assigned
Fields are rendered based on their type with appropriate input controls.
In Lead Tables
Fields marked with Show in Table appear as additional columns in lead list views under https://sellfaster.eu/home.
Filtering
Filter leads by custom field values in:
- Lead list views
- Advanced search
Visibility Conditions
Control when fields appear based on address type:
| Condition | Description |
|---|---|
| All | Field shows for all leads |
| Buildings Only | Field only shows for building-type leads |
| Non-buildings Only | Field only shows for non-building leads |
Permissions
| Action | Requirement |
|---|---|
| View custom fields page | everyone |
| Create/Edit fields | only the role manager and owner |
| Archive/Restore fields | only the role manager and owner |
| Create/Edit templates | only the role manager and owner |
| Assign templates | only the role manager and owner |
Additionally, all custom fields operations require an active premium subscription.
Best Practices
Field Design
- Plan ahead - Think about what data you'll need for reporting
- Use clear names - Make field labels self-explanatory
- Don't over-create - Only add fields you'll actually use
- Group logically - Use templates to organize related fields
- Mark PII fields as GDPR Relevant - Any field capturing personal identifiers (names, emails, phone numbers, national IDs) should have GDPR Relevant enabled so those values are excluded from AI processing and are automatically erased when a GDPR erasure is performed
Field Types
- Use appropriate types - Match the type to the expected data format
- Use selections for fixed options - Don't use text when choices are limited
- Use required sparingly - Only mark truly essential fields as required
Templates
- Create purpose-specific templates - Different campaign types may need different fields
- Set a default - Make the most common template the default
- Document purpose - Use descriptions to explain template usage
Troubleshooting
Field Not Appearing on Form
If a field doesn't show on an address form:
- Verify the field is included in a template
- Check the template is assigned to the campaign
- Verify the field is not archived
- Check the visibility condition matches the address type
Validation Errors
If field values won't save:
- Check if the field is marked as required
- Verify the value matches the expected format
- Check min/max constraints
- For selections, ensure the value is a valid option
Premium Feature Unavailable
If you can't access custom fields:
- Verify your subscription plan (requires Premium, not Starter)
- Check your billing status
- Contact your team owner about subscription
Related Topics
- Managing Addresses - Using custom fields on addresses
- Project Configuration - Assigning templates to projects
- Advanced Search - Filtering by custom fields
- GDPR Settings & Data Protection - Data retention and erasure controls